


Automating Screenshot Uploads to App Store Connect with GitHub Actions

Introduction
In iOS development, building an app and manually capturing screenshots for multiple devices can be a tedious and time-consuming task. Automating these processes using GitHub Actions helps streamline the workflow, especially when dealing with multiple screen sizes and languages.
This blog post demonstrates how to automate the entire process—building the app, launching it in an iOS Simulator, capturing screenshots, and uploading them to App Store Connect. Leveraging App Store Connect’s API, this CI/CD pipeline can save time, ensure consistency, and improve efficiency during app release.
Why Automate?
Manually building apps, launching them in simulators, and capturing screenshots can be tedious. This becomes even more challenging when managing multiple devices and scenarios. GitHub Actions provides a platform to automate these tasks by creating a workflow that does everything from setting up dependencies to building, launching, and taking screenshots of your app.
Step-by-Step Guide
Here’s how I built this automation pipeline:
1. Setting Up the Workflow
We start by defining the GitHub Actions workflow file (iOS_Screenshot_Upload.yml). This file outlines the steps the workflow will take whenever changes are pushed to a specific branch (e.g., ScreenshotBuild).
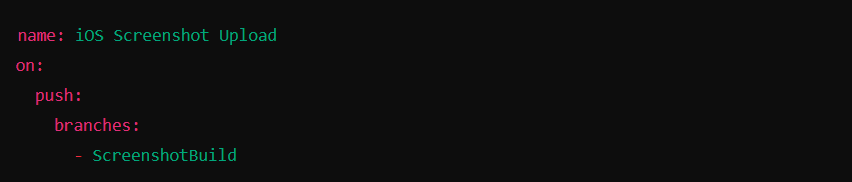
This ensures that the workflow triggers when code is pushed to the ScreenshotBuild branch.
2. Environment Setup
Setting up the environment is the next critical step. We need Python, Ruby (for CocoaPods), and Node.js for React Native dependencies.
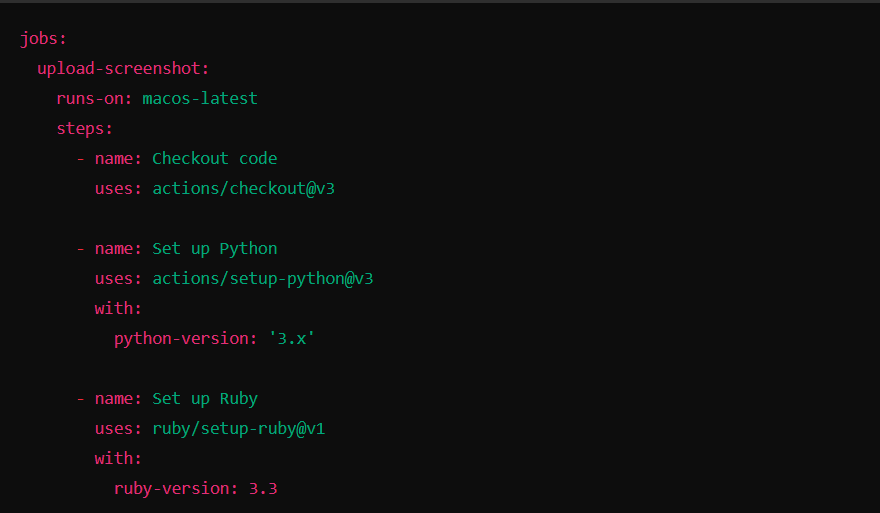
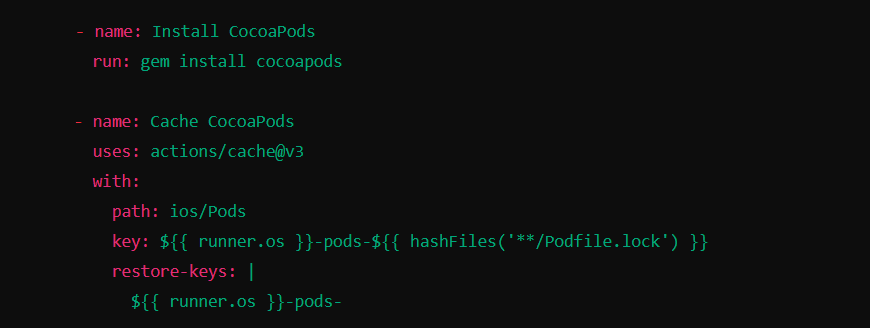
We also use CocoaPods for dependency management in iOS and cache them to speed up subsequent builds.
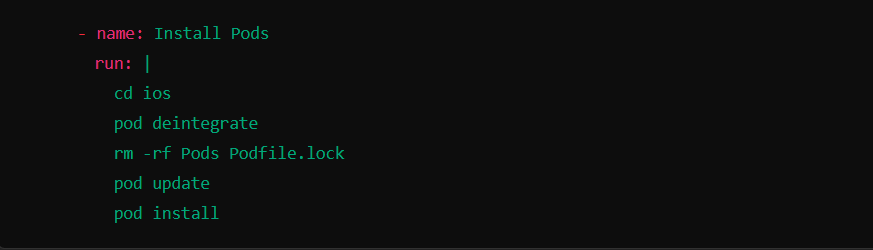
3. Installing and Updating Pods
We integrate CocoaPods with our project by updating and installing the necessary dependencies:
4. Building the App
To simulate the app on a specific device, we build the app for the iOS Simulator (in this case, using the iPhone 14). Before building, we clean the build folder and Derived Data:
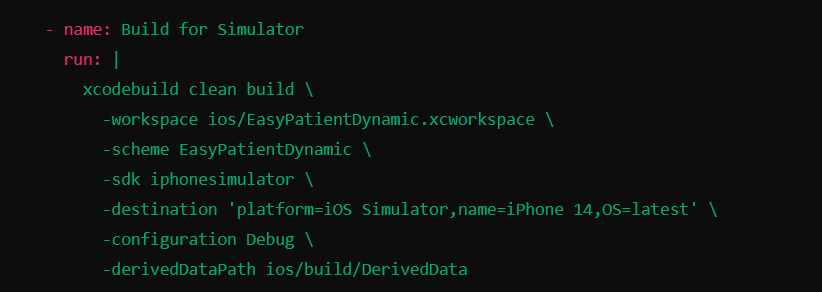
This step compiles the app and prepares it for installation on the simulator.
5. Booting the Simulator and Launching the App
After successfully building the app, we find the UUID of the desired simulator, boot it, and install the app.
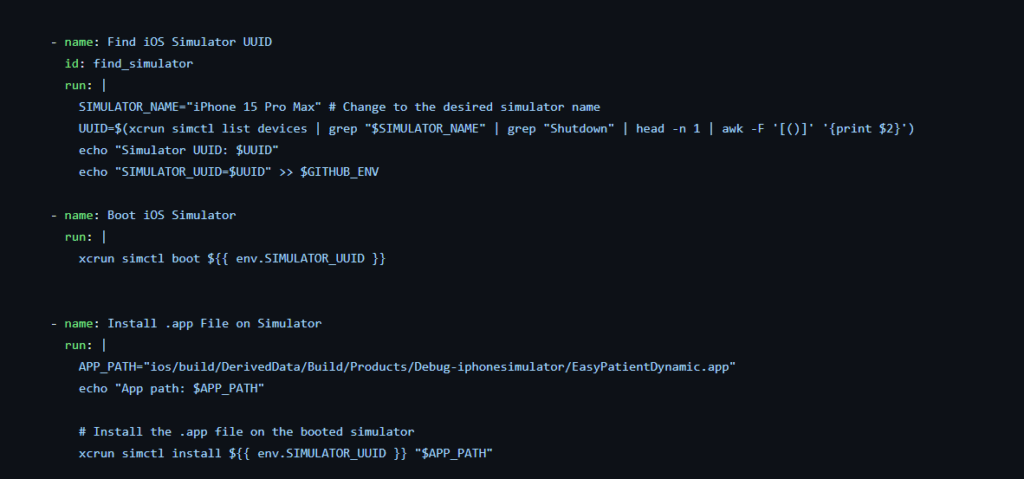
The app is launched using its Bundle ID.
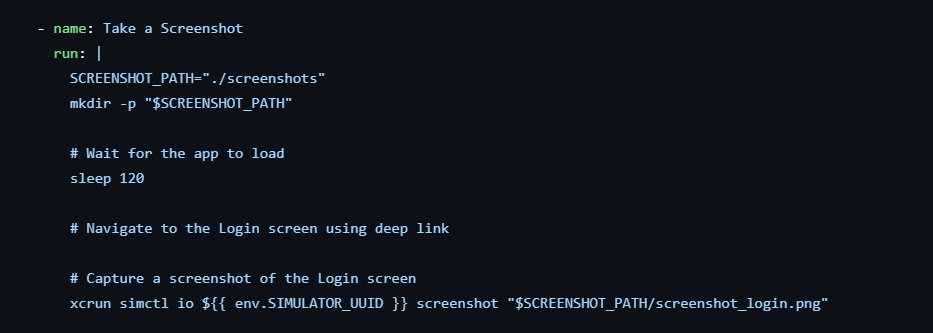
6. Capturing the Screenshots
Screenshots are captured using UUID of emulator and path defined to save screenshot as desired place.
7. Uploading and Downloading Screenshots
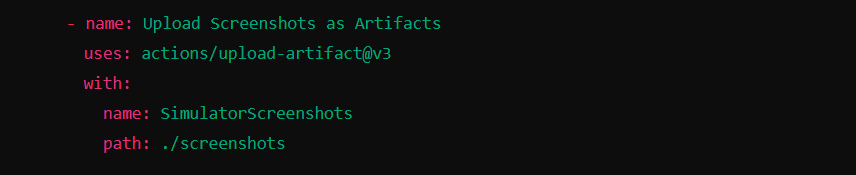
The screenshots are uploaded as artifacts so that they can be easily accessed:
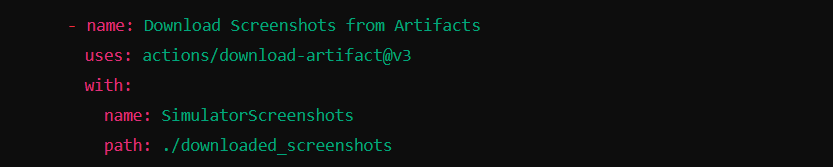
To download them later, we use the download-artifact action:
8. Create Screenshot Set
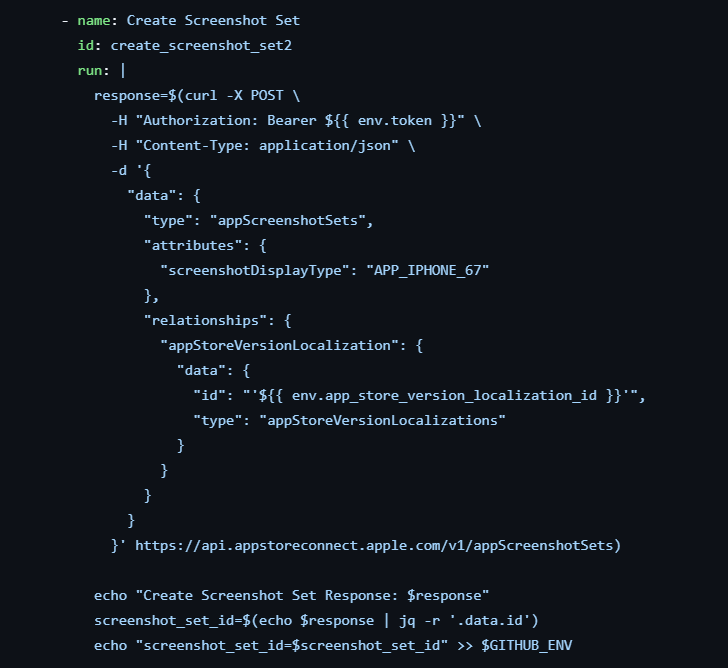
The first API request is responsible for creating a new screenshot set associated with a specific app version on App Store Connect. A screenshot set groups screenshots that are specific to a particular display type, like for iPhones, iPads, or other devices.
- URL: /v1/appScreenshotSets
- Request Type: POST
- Description: This API creates a screenshot set for a specific app version localization.
- Payload: It includes details such as screenshotDisplayType, which specifies the type of screenshots (e.g., iPhone 6.7″ display), and the ID of the app’s version localization.
- Response: The API returns an ID for the newly created screenshot set, which is later used to upload screenshots to this set.
9. Upload Screenshots to App Store Connect
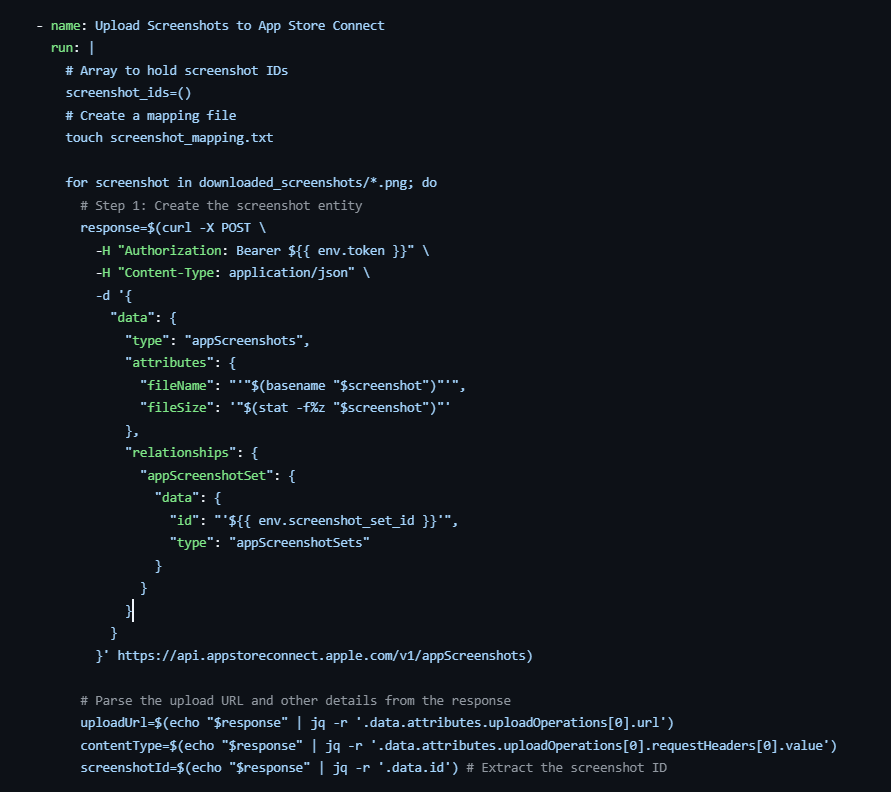
Once the screenshot set is created, this API request uploads screenshots to the App Store Connect. The process is divided into two steps: creating an entity for each screenshot and uploading the actual image file.
- URL: /v1/appScreenshots
- Request Type: POST
- Description: This API request initiates the upload process by creating an app screenshot entity. It defines the filename, file size, and links it to the appScreenshotSet.
- Response: The response contains details like the upload URL and Content-Type headersneeded for the next step, along with the screenshotId, which uniquely identifies the screenshot.
10. Upload Screenshot File
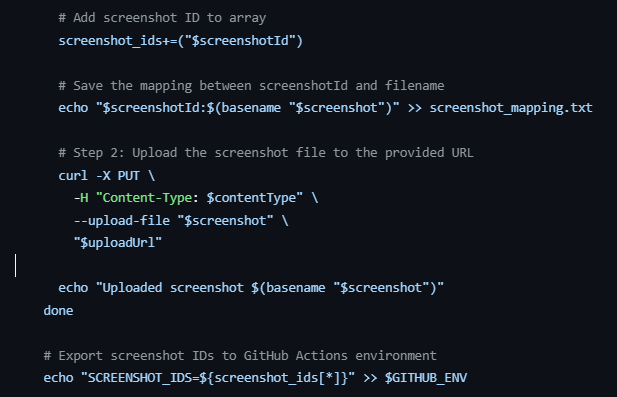
After creating the screenshot entity, the next API call uploads the actual image file to the provided URL.
- URL: The URL is dynamically provided in the previous response (uploadUrl).
- Request Type: PUT
- Description: This API uploads the screenshot image to the App Store Connect servers. It uses the Content-Type header specified earlier, and the image file itself is uploaded to the provided URL.
- Response: This step confirms the upload of the screenshot file to the server.
11. Commit Screenshot Reservation
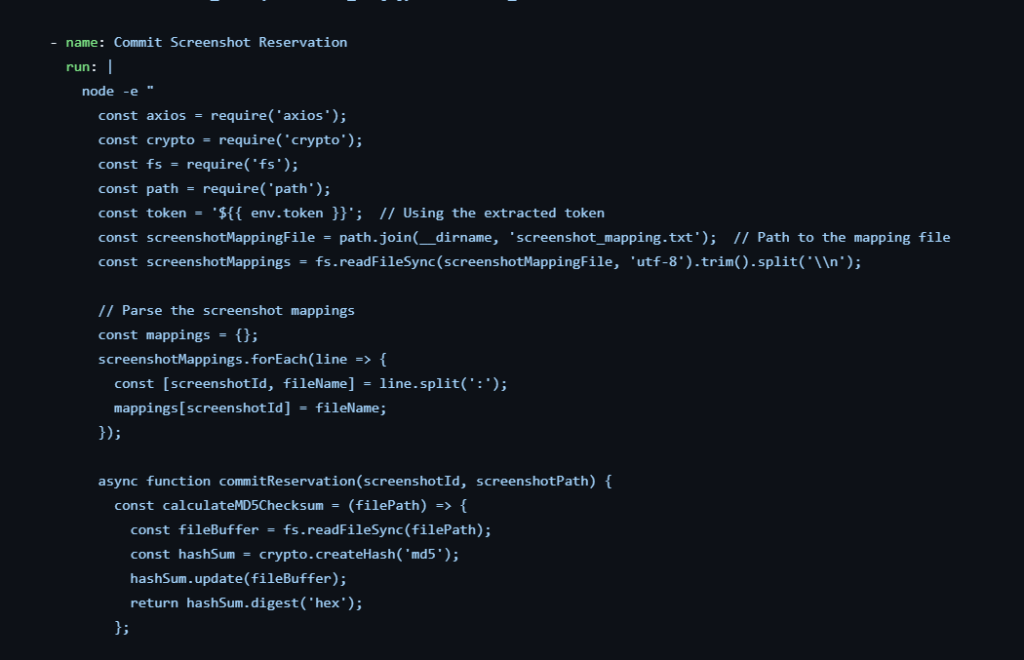
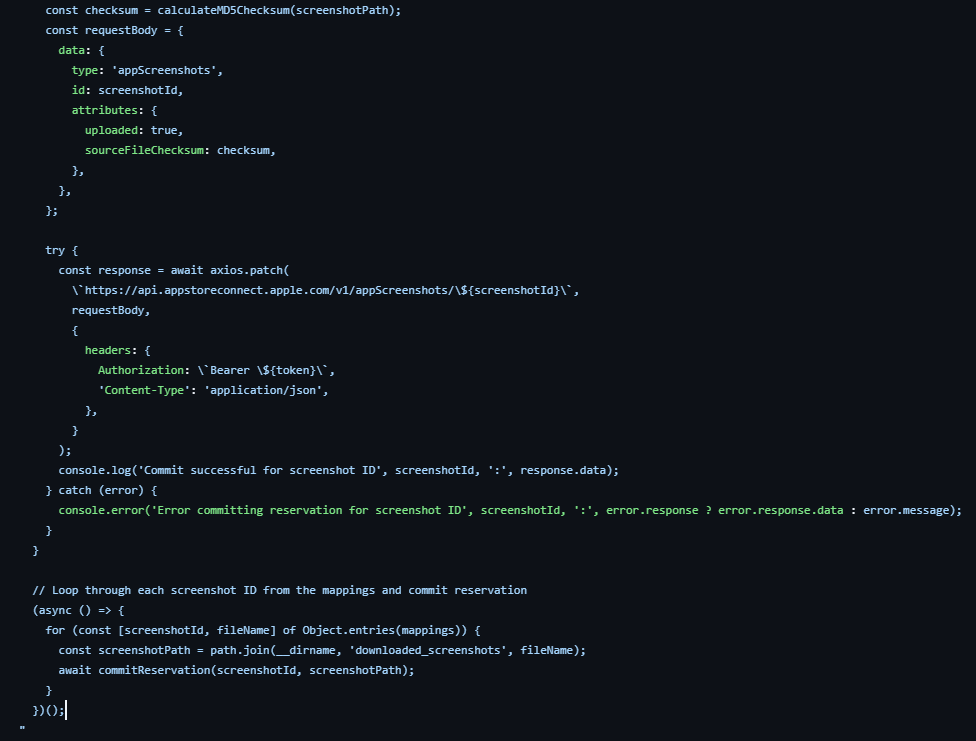
Finally, after uploading the screenshot, the reservation for the uploaded screenshot needs to be committed to App Store Connect. This ensures the screenshot is marked as uploaded and ready for review.
- URL: /v1/appScreenshots/{screenshotId}
- Request Type: PATCH
- Description: This API marks the screenshot upload as complete by committing the reservation. The payload includes the MD5 checksum of the uploaded file to verify its integrity.
- Response: The API responds with the status of the screenshot reservation, confirming that the screenshot is now available for the app version on the App Store.
Conclusion
By automating the iOS app testing and screenshot capture process, developers can avoid repetitive manual tasks and focus more on enhancing app features. This GitHub Actions workflow demonstrates how to build, launch, and capture screenshots on an iOS Simulator, followed by uploading those screenshots directly to App Store Connect. With this setup, you can easily extend automation to cover additional devices and screen variations, or even other App Store Connect tasks such as submitting apps for review.
Integrating automation into your development process can enhance productivity, minimize errors, and streamline app store submissions, making your iOS development lifecycle much smoother.
AWS Security Best Practices Every Business Should Follow
As more organizations migrate their applications and critical workloads to AWS, securing cloud environments has become a business priority rather than just an IT responsibility...
Read More
AWS Migration Checklist: A Practical Roadmap for Modern Businesses
Migrating businesses to AWS offers many benefits, including cost optimization, improved security, and greater scalability. However, a successful migration requires careful planning and execution. Otherwise, organizations may experience...
Read More
Agentic AI for QA & Software Testing with MCP Servers
For years, QA engineers have relied heavily on manual testing, repetitive validation, documentation, and traditional automation scripts But now, a new era of testing...
Read More
Our Proven Web Development Process That Delivers Real Results
In software development, success does not come from coding alone. Real results come from understanding business needs, planning the right workflow, building user-friendly designs...
Read More_16_11zon.webp&w=3840&q=100)
Secure AWS Connectivity Using AWS Systems Manager (SSM)
In traditional cloud architectures, secure access to private resources such as databases and internal servers often relies on...
Read More
Building a Secure Multi-Account AWS Architecture for Enterprise Environments (Dev, STG, UAT, Prod)
In today’s cloud-first world, scalability and speed are no longer enough security, governance, and cost control are equally critical...
Read More
Why You Should Use AI Agents Over Single Prompts: Unlocking the Power of Adaptive AI for Complex Workflows
In the world of artificial intelligence (AI), one of the biggest advancements has been the rise of AI agents that adapt dynamically to real-time data and complex workflows...
Read More_13_11zon.webp&w=3840&q=100)
Production Ready ( Quality, performance, and the lessons learned shipping to 150 stores )
We chose dbt over custom scripts, built observability, optimized performance, and shipped to production...
Read More_12_11zon.webp&w=3840&q=100)
Scaling from 15 to 150 Stores ( When copy-paste becomes technical debt, macros become salvation )
We built a pipeline with observability, incremental models for performance, and snapshots for history. Our 15-store deployment ran smoothly...
Read MoreReady to Work With Us?
Most engagements start with a 20-minute conversation. No pitch, no pressure - just an honest discussion about what you're building and whether we're the right fit.