
A Comprehensive Guide to Using Invoice Parser with Google Document AI

Introduction
In today’s fast-paced business environment, managing invoices efficiently is crucial for maintaining healthy financial operations. Manually processing invoices can be time-consuming and prone to errors, leading to delays and potential financial discrepancies. Enter Google Document AI’s Invoice Parser – a powerful tool that leverages machine learning to automate and streamline invoice processing. In this blog post, we’ll delve into what the Invoice Parser is and provide a step-by-step guide on how to set it up and use it effectively.
What is Google Document AI’s Invoice Parser?
Google Document AI is a suite of pre-trained machine learning models that enable businesses to extract structured data from unstructured documents seamlessly. The Invoice Parser is a specialized processor within Document AI designed specifically to handle invoice documents.
Key Features of Invoice Parser
Accurate Data Extraction : Extracts essential information such as invoice numbers, dates, vendor details, line items, totals, and more with high precision.
Scalability : Handles large volumes of invoices efficiently, making it suitable for businesses of all sizes.
Integration : Easily integrates with existing workflows and systems through APIs.
Customization : Allows for custom training to improve accuracy based on specific invoice formats and requirements.
Security : Ensures data privacy and security compliant with industry standards.
Step-by-Step Guide to Using Invoice Parser
Step 1: Sign in to Google Cloud Console
Begin by signing in to your Google Cloud Console account.
Instructions:
- 1Navigate to [Google Cloud Console](https://console.cloud.google.com/).
- 2Enter your Google account credentials to sign in.
- 3If you don’t have an account, click on “Get started for free” to create one.
Step 2: Navigate to the Processor List and Select Invoice Parser
Once signed in, you’ll need to access the Document AI processors.
Instructions:
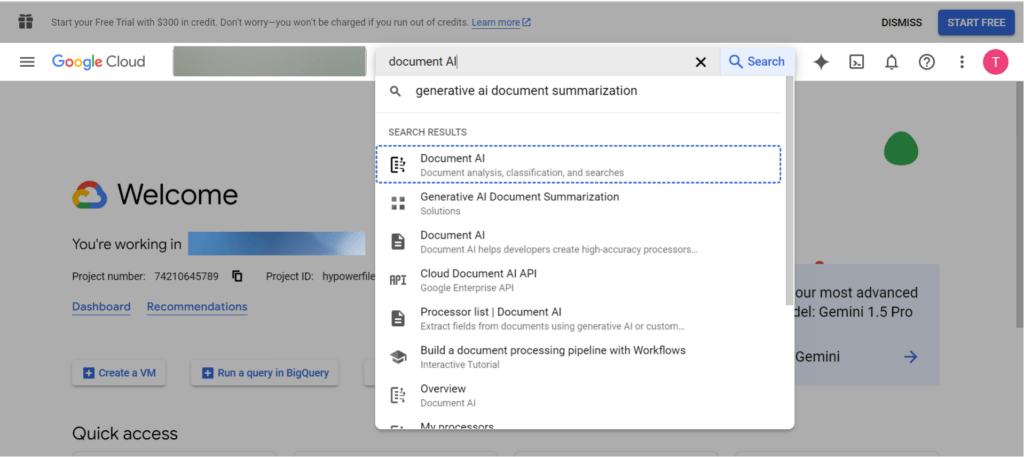
- 1In the Google Cloud Console dashboard, write Document AI and select it
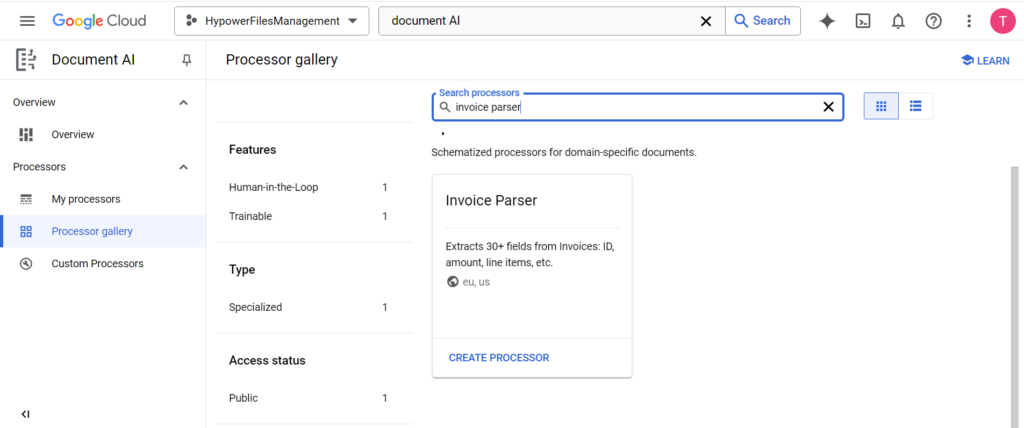
- 2From the left menu bar click on “Processors Gallery” to view the list of available processors.
- 3Locate and select “Invoice Parser” from the list.
- 4Click on the “Create Processor” button.
Step 3: Create a Processor and Name It
Now, you’ll create a new instance of the Invoice Parser tailored to your needs.
Instructions:
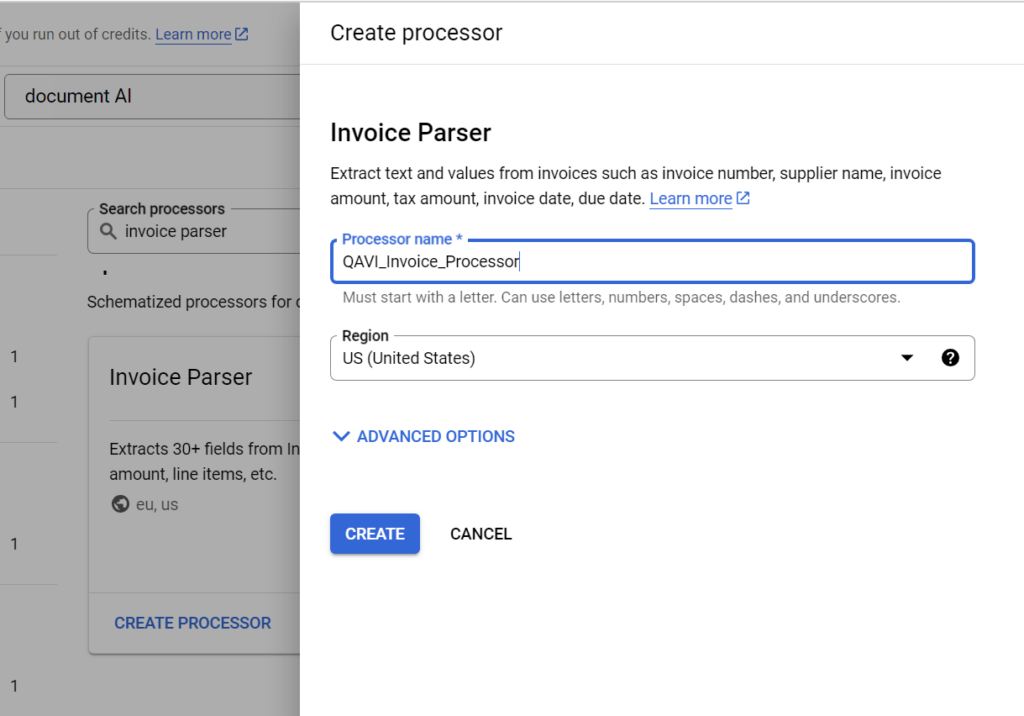
- 1Enter a descriptive name for your processor, such as “CompanyX_Invoice_Processor”.
- 2Select the desired region where the processor will be hosted.
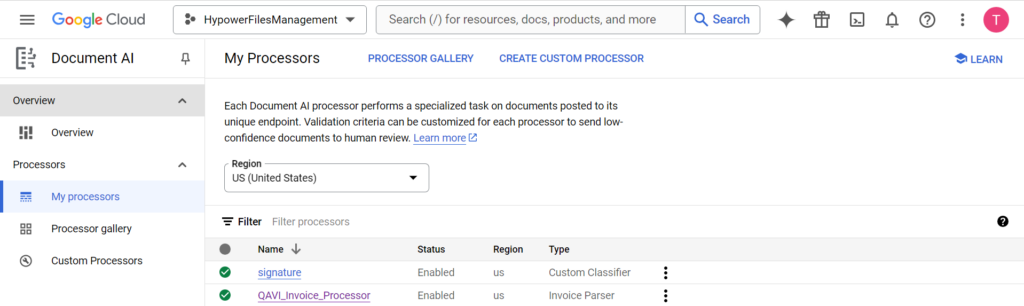
- 33. Click “Create” to initialize your processor.
Step 4: Import Documents for Training
To enhance the accuracy of your processor, you’ll need to train it using sample invoices.
Instructions:
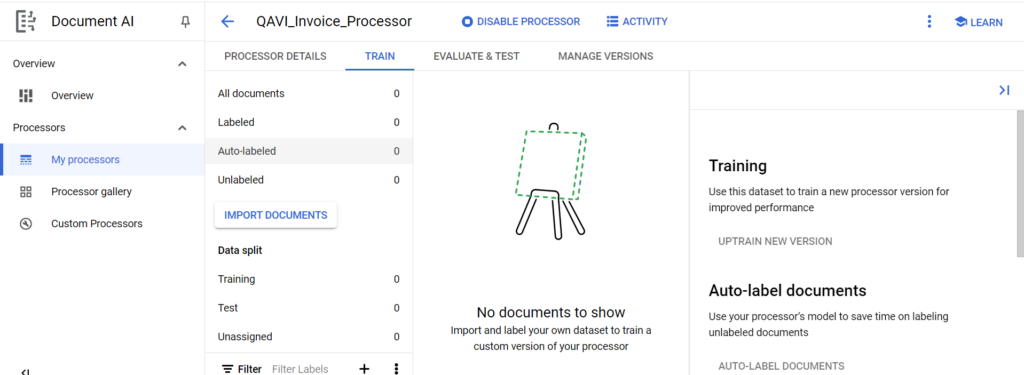
- 1Within your newly created processor, navigate to the “Training” tab.
- 2Click on Continue button, this creates an empty Google Cloud Storage folder to store your training documents and the labels you create.
- 3Click on “Import Documents” .
- 4Upload sample invoice documents that represent the variety you’ll be processing. Supported formats include PDF, JPEG, PNG, and TIFF.
- 5You can upload documents directly or connect to a Cloud Storage Bucket for bulk uploads.
- 6Once uploaded, the documents will appear in your training dataset.
Tips:
Provide a diverse set of invoices from different vendors and formats to improve the model’s robustness.
Ensure that the documents are clear and legible for optimal training results.
Step 5: Creating and Annotating Labels for Training
Labels help the processor understand and extract specific data fields from your invoices.
Instructions:
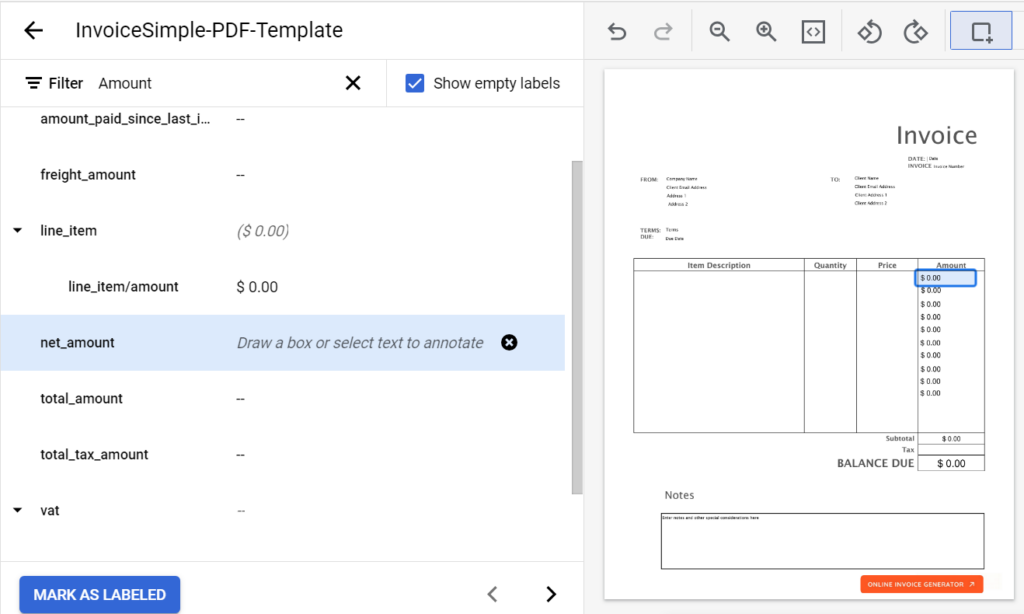
- 1After importing documents, proceed to “Labeling”. For this you need to select document want to label
- 2Open each document and manually annotate the fields you want the processor to extract, such as “Invoice Number” , “Date” , “Vendor Name” , “Amount” , etc.
- 3Use the annotation tool to draw boxes around the relevant data and assign the appropriate label and click ‘Marked As Labeled’.
- 4Repeat this process for multiple documents to provide ample training examples for each label.
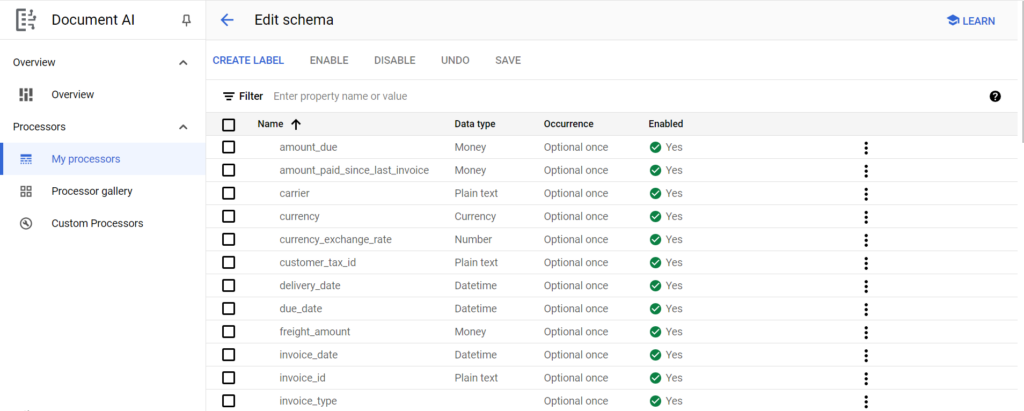
- 5If the pre-built parser doesn’t meet all your needs, you can create new labels (fields) from ‘Edit Schema’(you can find this on Train Screen). For example, if your invoices have unique fields like a project code or specific payment terms, you can add those to the model.
Step 6: Complete the Criteria of Training and Testing
Before initiating the training process, ensure that you’ve met the necessary criteria for effective training and testing.
Instructions:
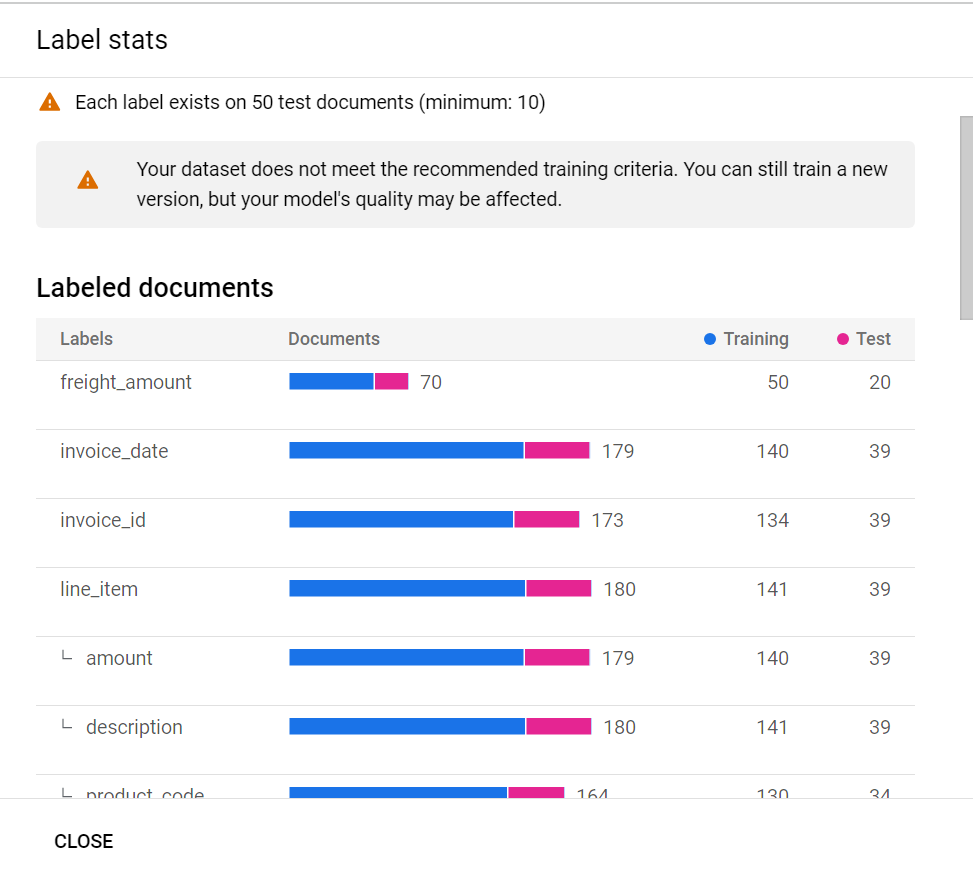
1. Verify that you have a sufficient number of labeled documents:
A minimum of 50 labeled documents is recommended for basic training.
2. Split your dataset into training and testing sets:
Allocate around 80% of documents for training and 20% for testing (you can do this when Importing documents)
3. Review your labeled data for consistency and accuracy.
Step 7: Start Training Your Processor
With your data prepared, you can now train your processor to recognize and extract the labeled fields.
Instructions:
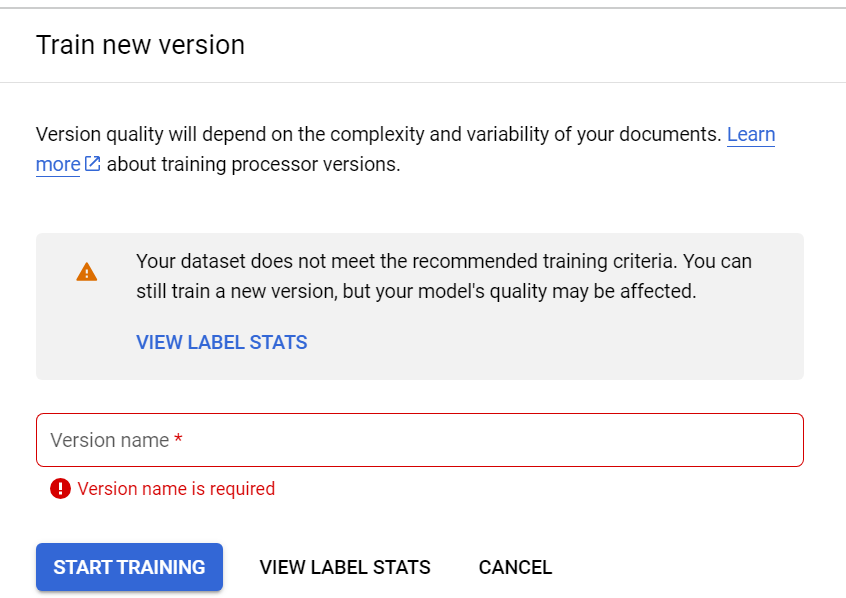
- 1Navigate to the “Training” section of your processor.
- 2Assign a version name and click on “Start Training”.
- 3Confirm and initiate the training process.
- 4Monitor the training progress through the console; training time may vary based on data volume and settings.
Step 8: Run Evaluation Tests
After training, it’s crucial to evaluate your processor’s performance to ensure it meets your accuracy requirements.
Instructions:
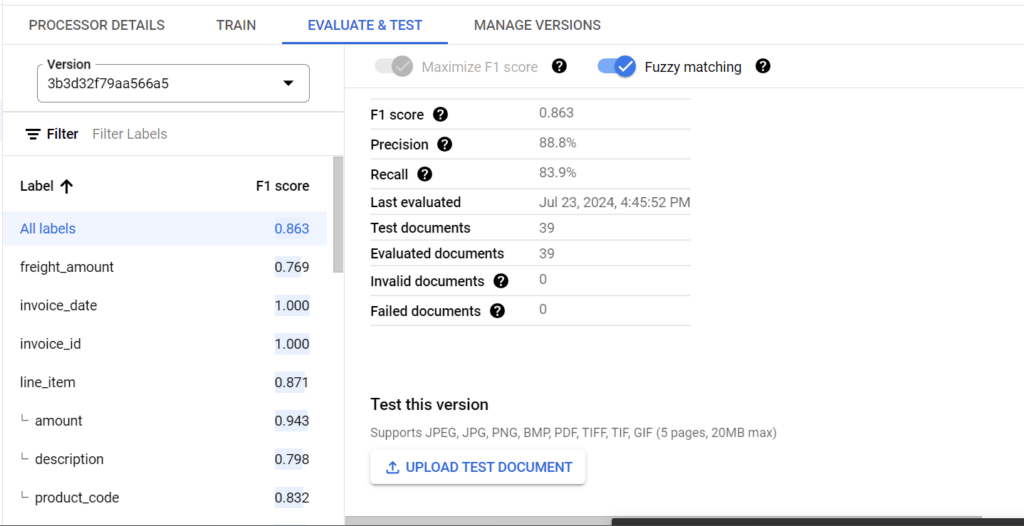
- 1Once training is complete, go to the “Evaluation” tab.
- 2Review the evaluation metrics provided, such as precision , recall , and F1 score for each labeled field.
- 3Test the processor by uploading new invoice documents and reviewing the extracted data.
- 4Identify any discrepancies or areas needing improvement.
Step 9: Deploy the Trained Version
Once satisfied with the evaluation results, you can deploy your trained processor for production use.
Instructions:
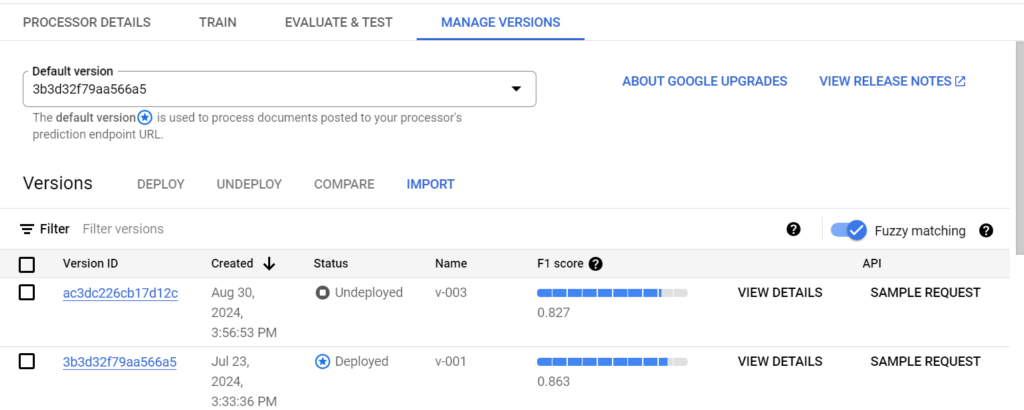
- 1In the “Manage Versions” section, select and deploy the Model you wanted to.
- 2After deployment, obtain the API endpoint and authentication credentials .
- 3Integrate the processor into your application or workflow by making API calls to process invoices.
"“Stay tuned for our upcoming blogs, where we’ll dive deep into API integration, covering everything from obtaining authentication credentials to seamlessly integrating the invoice processor into your workflows.”"
Conclusion
Implementing the Invoice Parser with Google Document AI can significantly enhance your organization’s invoice processing efficiency and accuracy. By following this comprehensive guide, you can set up a customized, high-performing invoice processing solution tailored to your specific needs. Embrace the power of machine learning to automate tedious tasks, reduce errors, and allocate resources more effectively.
Ready to streamline your invoice processing? Start leveraging Google Document AI’s Invoice Parser today and experience the transformative benefits of intelligent document processing in your business operations.
Additional Resources:
Google Document AI Documentation
(https://cloud.google.com/document-ai/docs)API Reference for InvoiceParser
https://docs.cloud.google.com/document-ai/docs/reference/rest/v1/projects.locations.processors)Best Practices for Document Processing
https://docs.cloud.google.com/document-ai/docs/overview
Clean Code vs. Overengineering: Where Should Developers Draw the Line?
Clean code reduces unnecessary complexity; overengineering invents it. A practical guide to using context, evidence, and the cost of change to know when to stop adding abstractions...
Read More
Kafka vs RabbitMQ vs AWS EventBridge: Choosing the Right Architecture Based on Business Requirements
Compare Kafka, RabbitMQ, and AWS EventBridge based on scalability, routing, event streaming, replay, infrastructure, and business requirements to choose the right architecture...
Read More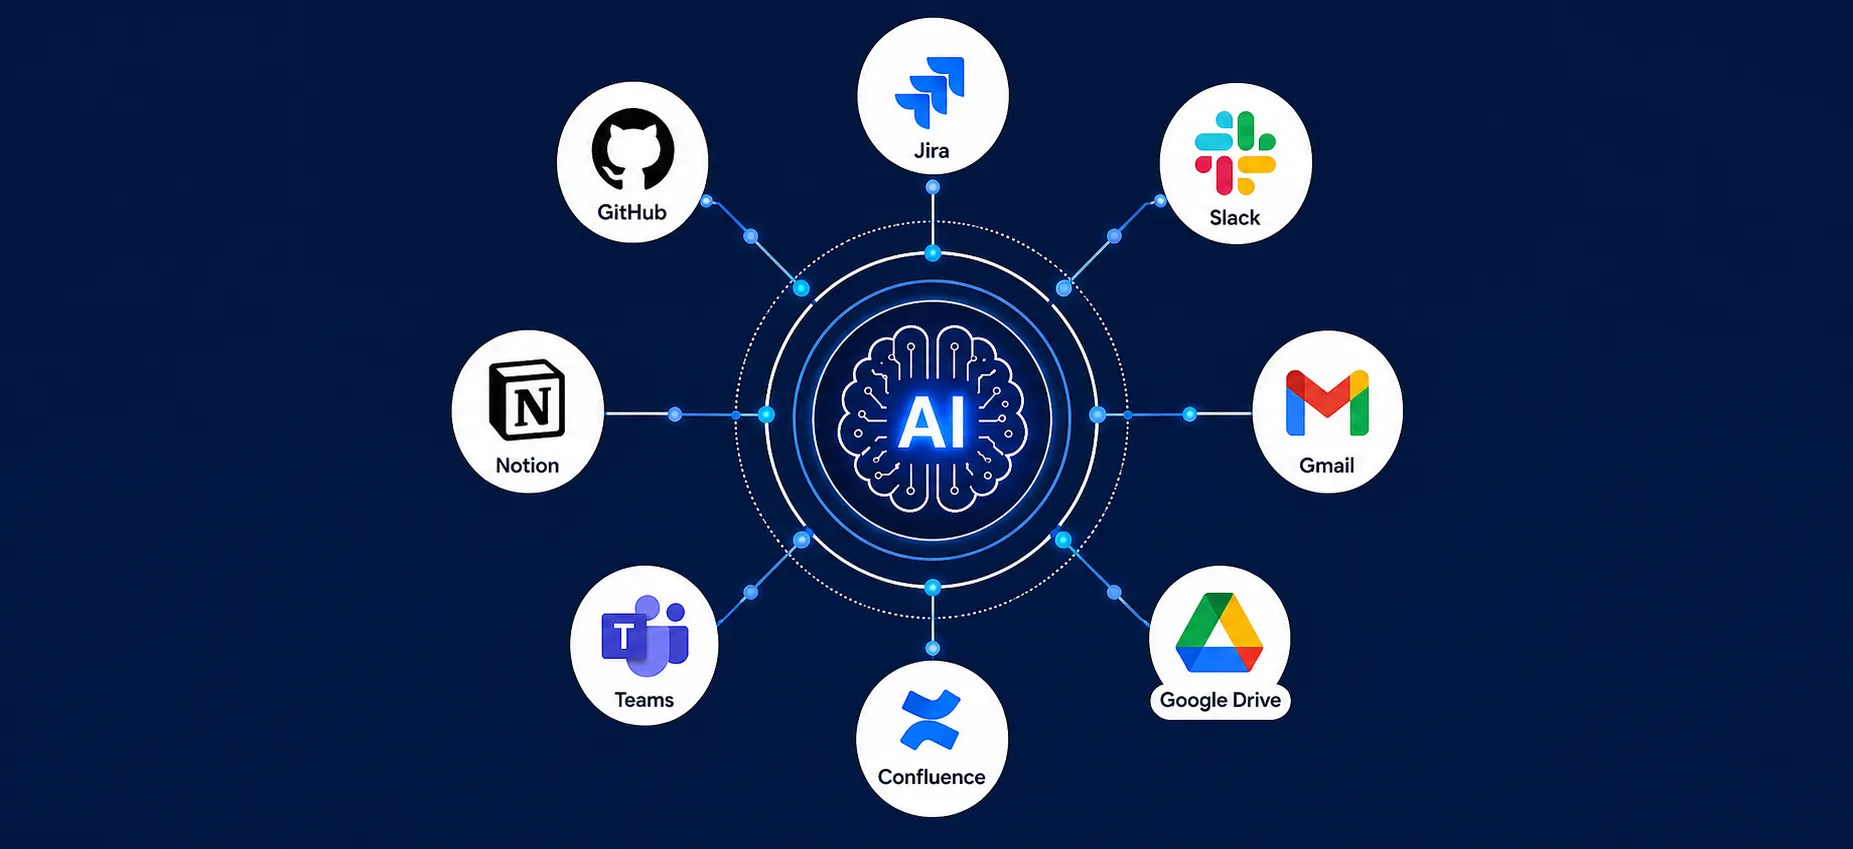
AI Integrations for QA Engineers
Learn how QA engineers can connect AI with Jira, GitHub, Slack, Notion and other tools to improve testing, bug tracking, reporting and QA productivity...
Read More
The Ultimate Guide to Amazon SES Setup with GoDaddy DNS
Learn how to set up Amazon SES with GoDaddy DNS. Complete step-by-step guide covering Easy DKIM, SPF, DMARC, custom MAIL FROM, and exiting the SES Sandbox...
Read More
AWS DevOps Agent Setup Guide with EC2
Learn how to set up AWS DevOps Agent with EC2, CloudWatch, IAM, and Agent Spaces for AI-assisted monitoring, incident investigation, and root-cause analysis...
Read More
Multi-Tenancy Patterns in DynamoDB: Silo, Pool, and Bridge Models
If you've already made the jump from a relational database to DynamoDB see our guide on moving relational data from SQL to DynamoDB...
Read More
We stopped leaving the IDE to design. Here’s our Cursor → Figma flow
Cursor drafts fast, catches gaps early, and still clips fields and breaks layouts. Here's the real pros-and-cons breakdown of our workflow...
Read More
AWS DevOps Agent: How AI is Automating On-Call Incident Response
If you've ever been on call during a production outage, you know how stressful it can be. Alerts start firing, dashboards light up, and suddenly you're jumping between monitoring tools...
Read More
Catch Missing Images Before Deploy: A Simple Pre-Build Script for Next.js
How Omax Tech added a lightweight image validation gate to Next.js 15 builds on Vercel...
Read MoreReady to Work With Us?
Most engagements start with a 20-minute conversation. No pitch, no pressure - just an honest discussion about what you're building and whether we're the right fit.